1、什么是热温冷架构?
通俗解读:热节点存放用户最关心的热数据;温节点或者冷节点存放用户不太关心或者关心优先级低的暖数据或者冷数据。
对于日志或指标(metric)类时序性强的ES索引,因为数据量大,并且写入和查询大多都是近期时间内的数据。我们可以采用hot-warm-cold架构将索引数据切分成hot/warm/cold的索引。
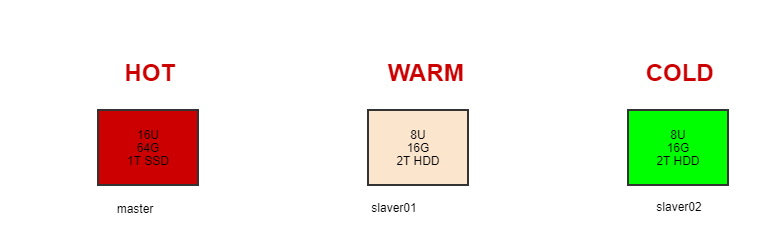
如下是最简单的热温冷架构部署图,HOT,WARM,COLD是节点属性,HOT节点负责最新数据的读写,可使用内存或者SSD进行存储;WARM负责较旧的数据读取,可以使用SSD或者HDD进行存储;COLD节点负责最旧的数据读取(很少被读取),可以采用HDD存储。
2、实战冷热架构
索引生命周期管理 (ILM) 是在 Elasticsearch 6.6(公测版)首次引入并在 6.7 版正式推出的一项功能。ILM 是 Elasticsearch 的一部分,主要用来管理索引。http://10.122.100.146:5601/app/kibana#/management?_g=()
2.1 以docker-compose方式部署elk
docker-compose
1
2
3
4
5
6
7
8
9
10
11
12
13
14
15
16
17
18
19
20
21
22
23
24
25
26
27
28
29
30
31
32
33
34
35
36
37
38
39
40
41
42
43
44
45
46
47
48
49
50
51
52
53
54
55
56
57
58
59
60
61
62
63
64
65
66
67
68
69
70
71
72
73
74
75
76
77
78
79
80
81
82
83
84
85
86
87
88
89
90
91
92
93
94
95
96
97
98
99
100
101
102
103
104
105
106
107
108
109
110
111
112
113
114
115
116
| version: "3"
services:
es-master:
container_name: es-master
hostname: es-master
image: elasticsearch:7.4.2
restart: always
ports:
- 9200:9200
- 9300:9300
volumes:
- ./elasticsearch/master/conf/es-master.yml:/usr/share/elasticsearch/config/elasticsearch.yml
- ./elasticsearch/master/data:/usr/share/elasticsearch/data
- ./elasticsearch/master/logs:/usr/share/elasticsearch/logs
environment:
- "ES_JAVA_OPTS=-Xms512m -Xmx512m"
es-slave1:
container_name: es-slave1
image: elasticsearch:7.4.2
restart: always
ports:
- 9201:9200
- 9301:9300
volumes:
- ./elasticsearch/slave1/conf/es-slave1.yml:/usr/share/elasticsearch/config/elasticsearch.yml
- ./elasticsearch/slave1/data:/usr/share/elasticsearch/data
- ./elasticsearch/slave1/logs:/usr/share/elasticsearch/logs
environment:
- "ES_JAVA_OPTS=-Xms512m -Xmx512m"
es-slave2:
container_name: es-slave2
image: elasticsearch:7.4.2
restart: always
ports:
- 9202:9200
- 9302:9300
volumes:
- ./elasticsearch/slave2/conf/es-slave2.yml:/usr/share/elasticsearch/config/elasticsearch.yml
- ./elasticsearch/slave2/data:/usr/share/elasticsearch/data
- ./elasticsearch/slave2/logs:/usr/share/elasticsearch/logs
environment:
- "ES_JAVA_OPTS=-Xms512m -Xmx512m"
es-head:
container_name: es-head
image: mobz/elasticsearch-head:5
restart: always
ports:
- 9100:9100
depends_on:
- es-master
- es-slave1
- es-slave2
kibana:
container_name: kibana
hostname: kibana
image: kibana:7.4.2
restart: always
ports:
- 5601:5601
volumes:
- ./kibana/conf/kibana.yml:/usr/share/kibana/config/kibana.yml
environment:
- elasticsearch.hosts=http://es-master:9200
depends_on:
- es-master
- es-slave1
- es-slave2
filebeat:
container_name: filebeat
hostname: filebeat
image: docker.elastic.co/beats/filebeat:7.4.2
restart: always
volumes:
- ./filebeat/conf/filebeat.yml:/usr/share/filebeat/filebeat.yml
- ./logs:/home/project/spring-boot-elasticsearch/logs
- ./filebeat/logs:/usr/share/filebeat/logs
- ./filebeat/data:/usr/share/filebeat/data
links:
- logstash
depends_on:
- es-master
- es-slave1
- es-slave2
logstash:
container_name: logstash
hostname: logstash
image: logstash:7.4.2
command: logstash -f ./conf/logstash-filebeat.conf
restart: always
volumes:
- ./logstash/conf/logstash-filebeat.conf:/usr/share/logstash/conf/logstash-filebeat.conf
environment:
- elasticsearch.hosts=http://es-master:9200
- xpack.monitoring.elasticsearch.hosts=http://es-master:9200
ports:
- 5044:5044
depends_on:
- es-master
- es-slave1
- es-slave2
|
es-master
1
2
3
4
5
6
7
8
9
10
11
12
13
14
15
16
17
18
19
20
21
22
23
24
25
26
27
28
29
|
cluster.name: es-cluster
node.name: es-master
node.master: true
node.attr.hotwarm_type: hot
node.data: true
network.host: 0.0.0.0
http.port: 9200
transport.port: 9300
discovery.seed_hosts:
- es-master
- es-slave1
- es-slave2
cluster.initial_master_nodes:
- es-master
http.cors.enabled: true
http.cors.allow-origin: "*"
xpack.security.enabled: false
|
es-slave1
1
2
3
4
5
6
7
8
9
10
11
12
13
14
15
16
17
18
19
20
21
22
23
24
25
26
27
28
29
|
cluster.name: es-cluster
node.name: es-slave1
node.master: true
node.attr.hotwarm_type: warm
node.data: true
network.host: 0.0.0.0
http.port: 9201
discovery.seed_hosts:
- es-master
- es-slave1
- es-slave2
cluster.initial_master_nodes:
- es-master
http.cors.enabled: true
http.cors.allow-origin: "*"
xpack.security.enabled: false
|
es-salve2
1
2
3
4
5
6
7
8
9
10
11
12
13
14
15
16
17
18
19
20
21
22
23
24
25
26
27
28
29
|
cluster.name: es-cluster
node.name: es-slave2
node.master: true
node.attr.hotwarm_type: cold
node.data: true
network.host: 0.0.0.0
http.port: 9202
discovery.seed_hosts:
- es-master
- es-slave1
- es-slave2
cluster.initial_master_nodes:
- es-master
http.cors.enabled: true
http.cors.allow-origin: "*"
xpack.security.enabled: false
|
2.2 配置ILM策略
1
2
3
4
5
6
7
8
9
10
11
12
13
14
15
16
17
18
19
20
21
22
23
24
25
26
27
28
29
30
31
32
33
34
35
36
37
38
39
40
41
42
43
44
45
46
47
48
49
50
51
52
53
54
55
56
57
58
59
60
61
62
63
64
65
66
| PUT _ilm/policy/nginx_ilm_policy
{
"policy": {
"phases": {
"hot": {
"actions": {
"rollover": {
"max_docs": "10000"
}
}
},
"warm": {
"min_age": "5s",
"actions": {
"allocate": {
"include": {
"hotwarm_type": "warm"
}
}
}
},
"cold": {
"min_age": "20s",
"actions": {
"allocate": {
"include": {
"hotwarm_type": "cold"
}
}
}
}
}
}
}
PUT _template/nginx_ilm_template
{
"index_patterns": ["nginx_logs-*"],
"settings": {
"number_of_shards": 1,
"number_of_replicas": 0,
"index.lifecycle.name": "nginx_ilm_policy",
"index.lifecycle.rollover_alias": "nginx_logs",
"index.routing.allocation.include.hotwarm_type": "hot"
}
}
PUT nginx_logs-000001
{
"aliases": {
"nginx_logs": {
"is_write_index":true
}
}
}
PUT _cluster/settings
{
"persistent": {
"indices.lifecycle.poll_interval":"1s"
}
}
|
2.3 批量插入数据
1
2
3
4
5
6
7
8
9
10
11
12
13
14
15
16
17
18
19
20
21
22
23
24
25
26
27
28
29
30
31
32
33
34
35
36
37
38
39
40
| import time
from elasticsearch import helpers, Elasticsearch
es = Elasticsearch(
['10.122.100.146:9200']
)
docs = []
count = 0
for num in range(1, 10000000):
count += 1
doc = {
"_index": "nginx_logs",
"_type": "_doc",
"_source": {
"name": "name:{}".format(num),
"name1": "name1:{}".format(num),
"name2": "name2:{}".format(num),
"name3": "name3:{}".format(num),
"name4": "name4:{}".format(num),
"name5": "name5:{}".format(num),
"name6": "name6:{}".format(num),
"name7": "name7:{}".format(num),
"name8": "name8:{}".format(num),
"name9": "name9:{}".format(num),
}
}
docs.append(doc)
if docs.__len__() == 2000:
n0 = time.time()
a = helpers.bulk(es, docs)
n1 = time.time()
print("count is {}, insert {} cost {}s".format(count, a, n1 - n0))
docs = []
if docs.__len__() != 0:
n0 = time.time()
a = helpers.bulk(es, docs)
n1 = time.time()
print("count is {}, insert {} cost {}s".format(count, a, n1 - n0))
|
2.4 通过elasticsearch_head插件查看分片情况
http://10.122.100.146:9100/